Your kitchen is the engine of your home, and its layout determines whether it runs smoothly or stalls. I’ll show you how to position appliances strategically, organize work zones, and eliminate wasted steps.
The difference between a cramped, frustrating kitchen and one that feels spacious and efficient often comes down to intentional planning. Here’s what makes kitchens into spaces you’ll actually enjoy using.
Start With Your Appliances and Sink

How should you approach designing a kitchen that truly works for you? I’d recommend starting with your large appliances and sink first, as they’re the foundation of your kitchen layout.
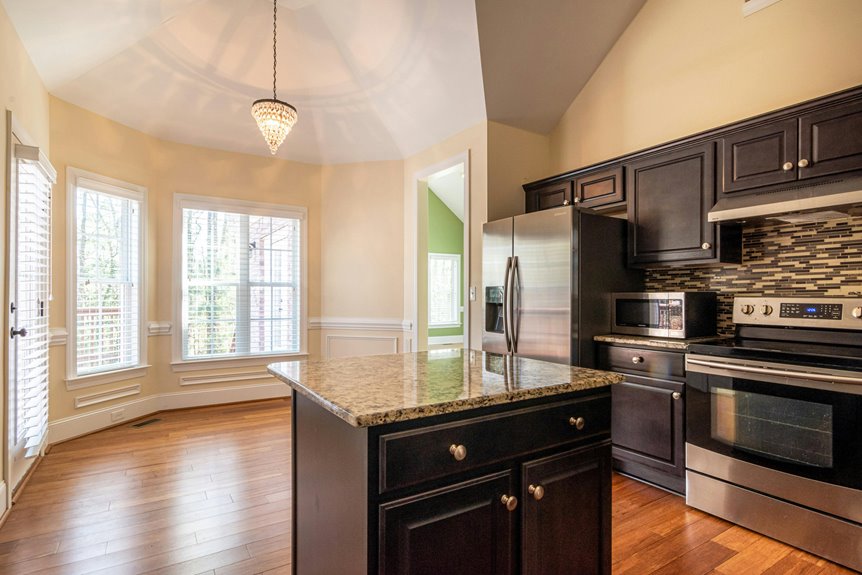
Your refrigerator, sink, and rangetop should form a functional working triangle. This arrangement creates an efficient workflow that you’ll use daily. Position these three elements strategically to minimize unnecessary steps between them.
Next, consider how each appliance choice influences your surrounding cabinetry and storage solutions. A gas rangetop, for example, requires specific ventilation and countertop placement. Your sink location determines where you’ll install your dishwasher and prep areas.
Planning appliances first guides all subsequent decisions about cabinets, counters, and storage. This approach ensures your kitchen layout serves your actual cooking needs while maximizing usable space. You’ll create a well-designed kitchen that works for your household’s lifestyle.
Choose a Layout That Fits Your Space

Now that you’ve positioned your major appliances, it’s time to choose a kitchen layout that actually fits your space.
Consider these proven configurations: Single-wall and galley layouts work well for compact kitchens, keeping everything within arm’s reach while maintaining an efficient work triangle. L-shaped designs use two adjacent walls effectively, creating natural flow and accommodating an island or dining area without overwhelming smaller spaces.
Islands and peninsulas extend your counter and seating capacity while preserving open-concept feel. They’re ideal when you want additional prep zones without full separation.
Assess your room’s dimensions and traffic patterns honestly. Measure twice, then match your layout choice accordingly. Your kitchen should feel spacious and organized, not cramped. The right layout maximizes storage space and functionality while supporting how you actually cook and gather.
Map Out Your Four Work Zones

Once you’ve selected your layout, the next step is mapping out your four work zones to keep your kitchen running smoothly.
1. Prepping Zone
Position your prep area near cooking appliances. Store frequently used items, vinegars, oils, spices, within arm’s reach to minimize movement between tasks.
2. Cooking Zone
Keep this zone adjacent to your prep area. This proximity streamlines your workflow from ingredient preparation to cooking.
3. Clean-Up Zone
Organize this around your sink and dishwasher. The sequential arrangement from meal prep through cleanup reduces unnecessary steps.
4. Putting Away Zone
Locate storage near your refrigerator. This placement facilitates efficient transfer and supports inventory-driven storage planning.
Using zone-based planning informs your drawer and cabinet specifications. Match storage depths and widths to each zone’s contents, so everything remains accessible throughout your layout.
Size Cabinets and Storage to Fit Your Workflow
Now that you’ve mapped your four work zones, I’ll show you how to size cabinets and storage specifically for each zone’s demands.
You’ll assess what items each zone needs, measure your tallest bottles and pans, then position shelves and pull-outs accordingly. This inventory-driven approach creates a personalized system that supports how you actually cook.
Zone-Based Cabinet Planning
The most efficient kitchens match cabinet sizes and storage types directly to how you actually work. Zone-based planning organizes your storage around four key areas: prepping, cooking, cleanup, and putting away.
In your prepping zone, install pull-out shelves for pantry essentials like oils and spices. This minimizes reaching and improves visibility when you’re chopping vegetables or measuring ingredients.
Adjust cabinet depths to match your workflow needs. Deeper cabinets work well for bulk items, while shallower ones suit frequently accessed tools.
Position your putting away zone near the fridge. This streamlines transferring groceries and leftovers, reducing unnecessary steps. Use cabinet heights that fit your tallest bottles and containers, eliminating wasted vertical space.
Customize drawer partitions based on access frequency. This personalized approach creates a kitchen where everything has its logical place.
Inventory-Driven Storage Allocation
How do you know if your cabinets truly fit your lifestyle? I’ll tell you: when your inventory-driven storage allocation matches your actual cooking habits. Start by cataloging everything you own, then assign each item a home based on frequency and workflow.
| Item Category | Storage Type | Location | Depth | Access |
|---|---|---|---|---|
| Oils & Spices | Pull-out shelves | Prep zone | 6″ | Daily |
| Sheet pans | Wide shelves | Near prep | 18″ | Weekly |
| Pots & pans | Deep drawers | Cooking zone | 12″ | Regular |
| Utensils | Shallow drawers | Counter edge | 4″ | Constant |
| Pantry staples | Labeled bins | Prep area | 8″ | Daily |
This inventory-driven approach supports your kitchen layout and work triangle efficiently. Pull-out shelves minimize reaching while storage optimization keeps frequently used items accessible.
You’ll discover that cabinets sized specifically for your contents improve how you cook and move through space.
Accessibility and Measurement Strategy
Once you’ve cataloged your kitchen inventory, sizing your cabinets and storage to match your workflow becomes the critical next step. I measure the tallest bottle or canister in my collection to set pull-out shelves at heights keeping frequently used items within a comfortable 15–18 inch reach from the work surface. This accessibility strategy eliminates deep searching and reduces strain during meal prep.
I choose pull-out shelves over fixed cabinets for pantry essentials, prioritizing ease of access. Next, I align drawer partitions and cabinet widths to my actual contents, dedicating vertical space for bottles and canisters while using dividers for smaller items. This measurement-driven kitchen layout approach supports my workflow and improves how efficiently I move through daily cooking tasks.
Stock Your Island and Pantry Strategically
Where you place items in your kitchen dramatically impacts how efficiently you’ll cook and prep meals. I’ve found that strategic island storage keeps essentials within arm’s reach.
1. Organize Your Prep Zone
Position vinegars, oils, and spices near your prepping area. This reduces unnecessary movement and streamlines your workflow efficiency. Keep sheet pans and baking pans close by as well, minimizing the distance you’ll travel during meal preparation.
2. Create a Put-Away Zone
Establish dedicated cabinets near your fridge for quick transfers. Size drawers to match your zone contents, preventing overstuffed spaces.
3. Inventory Before Stocking
Document what you currently own. This prevents overpacking your island and pantry organization while giving everything a designated home. Strategic placement helps you build the functional kitchen you want.
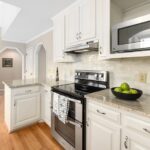
Use Light Colors and Reflective Surfaces to Expand Space

Choose glossy eggshell white walls or light peach accents that bounce light throughout your kitchen. Install reflective appliances, shiny metal finishes, and mirrors to amplify both natural and artificial light. These surfaces create brightness that makes rooms feel open and welcoming.
| Design Element | Impact | Installation | Benefit |
|---|---|---|---|
| Light wall colors | Reflects light | Paint application | Larger feel |
| Reflective surfaces | Amplifies brightness | Mount strategically | Enhanced openness |
| Large windows | Increases daylighting | Professional install | Reduced artificial lighting |
| Layered lighting | Expands depth | Task and accent | Visual dimension |
Implement layered lighting with task, accent, and hidden options. This strategic approach draws attention to features while expanding spatial depth.
Your kitchen becomes a brighter, more spacious environment with these design choices.
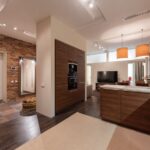
Keep Your Layout Open to Multiple Users

How can your kitchen encourage conversation and collaboration while meals are being prepared?
An open-concept layout keeps your kitchen connected to living and dining spaces, eliminating barriers that separate cooks from family and guests. This design fosters natural interaction during food preparation.
Islands or peninsulas create a shared activity zone where multiple people gather comfortably. Seating at these features allows others to engage while you work, making meal prep a social experience.
Strategic planning prevents congestion in your open-concept kitchen. Prioritize accessible storage at convenient heights and clear traffic flow paths so several people can move freely without obstacles.
Transparent partitions like glass doors or transom windows preserve openness while defining collaboration areas. This balanced approach maximizes your space’s functionality while maintaining the connected feeling your household needs.
Clear Counters to Maximize Perceived Space

I’ll make your kitchen feel larger by clearing counters through daily decluttering, strategic storage, and minimalist styling. You’ll discover that removing rarely used items and implementing dedicated storage solutions instantly creates an open, spacious atmosphere.
These straightforward approaches work together to maximize both your actual workspace and your kitchen’s perceived size.
Declutter Daily Routines
When’s the last time you looked at your kitchen counter and saw only what you actually need? I’ve found that establishing a daily declutter routine changes how I experience my kitchen. Each evening, I return items to their organization zones and wipe surfaces clean. This simple habit reclaims valuable countertop space and improves storage efficiency.
I keep only essential tools on my prep surface, typically a cutting board and knife. Everything else finds its place in designated storage areas. I also position a small catch-all tray near my entry point to capture stray items before they scatter across counters.
This daily reset takes minutes but delivers significant results. My kitchen feels larger and more functional. By maintaining these routines consistently, I’ve changed how I work and move through the space.
Strategic Storage Solutions
Where does your kitchen hide its wasted potential? Strategic storage solutions move items off counters and into smart systems.
Install pull-out shelves and deep drawers throughout your pantry organization zones. These features maximize storage without consuming valuable counter real estate. Position your most-used prep items—oils, vinegars, spices—near your prep area for efficient workflow.
Design designated zones with specific cabinet widths and depths. This approach means drawers and pull-outs accommodate your actual items, eliminating future reorganization hassles.
Convert awkward corners using hinged or rotating modules. Place sheet pans closer to your prep area for quicker access during cooking.
Map your fridge and freezer contents on magnetic boards. This system streamlines both put-away and retrieval, creating the organized kitchen you deserve to experience daily.
Minimalist Counter Styling
How much visual breathing room can you reclaim by removing just a few items?
Minimalist counter styling means keeping only essentials visible. I recommend displaying a knife block, cutting board, and single utensil jar. This approach reduces countertop clutter by 10–20%, making your kitchen feel notably larger.
Integrated appliances change how your space functions. Under-cabinet microwaves and pocket-door storage hide everyday items while maintaining full functionality. Slim-profile appliances like compact toasters and coffee makers preserve workspace without sacrifice.
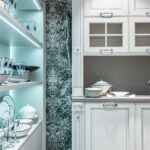
Open shelving paired with light colors and reflective finishes extends perceived space. Glass-front upper cabinets create visual lightness while keeping frequently used items accessible.
The result? Clear surfaces that invite cooking and gathering. You’ll discover that restraint, not elimination, creates a functional, spacious kitchen where everything serves a purpose.