I once watched a cramped kitchen change completely the moment we opened one wall; suddenly, the space felt less confined.
You’ve probably felt that same limitation: walls blocking light, separating you from family, making your kitchen feel isolated.
A well-designed pass-through changes everything.
The right dimensions, placement, and finishing touches can open your kitchen without requiring a full renovation.
Here’s how to choose the best approach for your home.
Start With Pass-Through Height and Width Fundamentals

What’s the best way to plan a kitchen pass-through that actually works? Start by considering height and width, that’s a good one to get right from the beginning.
Planning a kitchen pass-through? Start with height and width—getting these dimensions right from the beginning establishes your entire design’s foundation.
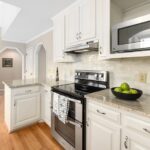
I recommend setting your pass-through at 16 to 18 inches above the countertop. This height aligns perfectly with bar or dining-height surfaces, making item hand-offs smooth and natural. You’ll find this dimension works for most households.
For width, plan on 24 to 36 inches as your standard range. If you’re serving larger items regularly, you can widen it to 42 inches or beyond. The wider opening accommodates bigger platters and serving dishes without awkward maneuvering.
These fundamental measurements create a functional interface between your kitchen and adjoining space. Getting these dimensions right establishes the foundation for your entire pass-through design.
Position Your Pass-Through Above the Sink for Natural Light

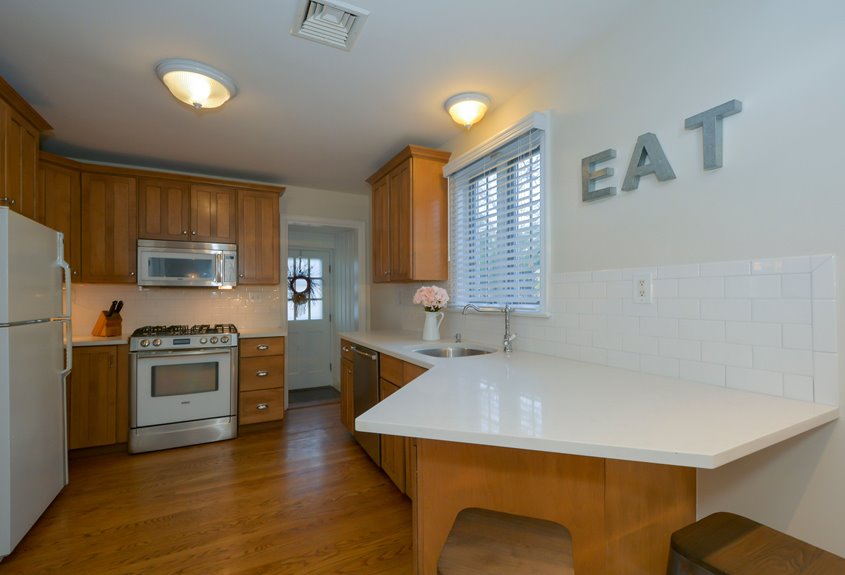
Where should you locate your pass-through for maximum impact? Positioning your pass-through above the sink preserves natural light from adjacent rooms while maintaining your kitchen’s aesthetic. This elevated opening creates visual connection between spaces without removing walls entirely. You’ll achieve that open feel while keeping your kitchen finishes intact.
| Feature | Benefit |
|---|---|
| Above-sink placement | Preserves window light and views |
| Elevated opening | Creates visual space connection |
| Integrated shelving | Adds functional storage nearby |
| Bar seating option | Enables casual dining space |
| Window integration | Maintains current kitchen look |
An above-sink pass-through accommodates bar seating or counter space on the adjoining room side. This supports informal dining and conversation naturally.
Shelving or display elements integrated into the opening’s adjoining side add storage without blocking light. You’re creating functionality and visual openness simultaneously.
Create a Peninsula With Bar Seating Opposite
How can you maximize your kitchen’s social flow without removing walls? A peninsula with opposite bar seating offers the perfect solution.
Position your peninsula as a distinct kitchen feature with an 8- to 12-inch overhang for comfortable stool legroom. This layout keeps your cooking zone functional while creating a casual dining area that faces the adjoining room. The pass-through above your sink becomes a visual connector, maintaining openness without requiring major structural changes.
Bar seating on the peninsula’s opposite side encourages natural conversation between kitchen and living spaces. You’ll preserve existing kitchen finishes on the cooking side while gaining extra counter space for serving and prep work.
This configuration also supports future flexibility. You can add integrated shelving or displays on the adjoining room side without disrupting your current kitchen layout.
Replace a Window With Floating Shelves and Display Storage

Consider replacing an existing kitchen window with functional display storage that opens up your space without requiring wall removal. I’d design shallow floating shelves, roughly 8 inches deep, that balance storage capacity with clear sightlines into adjoining rooms.
Key Design Elements:
- Frame material: Choose non-wood framing to preserve clean transitions between spaces and complement existing finishes.
- Display potential: Host decorative items, glassware, or cookbooks on your shelves, enhancing kitchen aesthetics while maintaining openness.
- Integration with pass-throughs: Pair shelving with counter seating in the adjoining room, supporting entertaining without extensive renovations.
This approach maintains your kitchen’s visual flow while adding practical storage. You’ll create a display area that reflects your personal style and keeps frequently used items accessible.
Open the Wall Without Frames for Clean Transitions
If you’ve decided against adding shelves, removing the wall entirely without frames delivers the cleanest possible result. I’d recommend this approach because it creates an uninterrupted visual flow between your kitchen and adjoining space.
Frameless openings eliminate wood trim that might interrupt your room’s aesthetic. This simple transition emphasizes the adjoining room’s design while maintaining practical functionality for passing items through.
Frameless openings eliminate visual interruptions, creating seamless transitions between spaces while maintaining practical functionality.
Consider these benefits:
- Preserved sightlines – You maintain clear views across both spaces, minimizing visual clutter.
- Design flexibility – The opening accommodates future room changes without reworking architectural details.
- Usable surface space – You can still add built-in shelves approximately 8 inches deep on the opposite side for display or storage.
This approach supports your goal of creating an open, unified living environment.
Add Counter Space to Maximize Your Pass-Through

I can make my pass-through more functional by adding counter space on the adjoining room’s side. An 8-inch-deep countertop creates the perfect shallow ledge for bar seating, serving, or even storage without overwhelming the window opening.
These three approaches—counter extensions, integrated seating, and clever storage—work together to maximize your pass-through’s potential.
Counter Extension Options
Why settle for a basic opening when you can extend your pass-through into a functional workspace?
Adding a counter extension creates a practical serving station from your pass-through. I recommend installing a 12 to 14-inch deep countertop on the kitchen side, providing ample space for plates, glasses, and serving dishes. This depth allows you to prepare items before passing them through without crowding the workspace.
On the adjoining room side, consider an 8-inch deep shelf. This shallow depth displays items beautifully while maintaining clear sightlines and traffic flow throughout your home.
Pairing your extended counter with bar stools creates a casual dining or breakfast area. This addition invites conversation and connection between spaces, making your home feel more open and welcoming to family and guests alike.
Bar Seating Integration
How can you turn a simple opening into a gathering spot that strengthens your home’s flow?
Adding a counter on the room-side of your pass-through creates an inviting bar area without requiring wall removal. An 8-inch shelf depth works well, balancing display space with practical functionality.
Key Design Elements:
- Counter Alignment – Match your counter finish to existing kitchen materials for visual continuity and professional appearance.
- Seating Comfort – Plan adequate leg room beneath the counter for standard bar stool height, typically 24-26 inches.
- Storage & Display – Incorporate built-in shelves on the room-side to showcase dishware or decorative items while maintaining sightlines.
- Location Strategy – Position your pass-through above the sink to preserve kitchen views while streamlining dish transfers.
This configuration turns your opening into a functional gathering point that naturally connects spaces.
Functional Storage Solutions
The real opportunity for a pass-through lies in treating it as a dual-purpose zone rather than a simple opening. I’d recommend adding a pass-through counter on the kitchen side that functions as extra prep space. This counter creates immediate workspace for meal preparation while maintaining your open sightline.
The adjoining room side features a matching 8-inch-deep shelf that visually links both spaces together. This shallow shelf prevents the opening from feeling disconnected while offering display opportunities.
To maximize storage without crowding the opening, include a built-in wastebasket pull-out in the base cabinets. A corner lazy Susan also works well for accessing items easily. These smart additions make your pass-through an organized, functional hub that serves both practical and aesthetic purposes for your redesigned kitchen layout.
Frame Storage Solutions Into the Sides

I can use my pass-through’s sides as functional storage by installing built-in shelving and cabinets that serve multiple purposes. These vertical spaces let me maximize every inch while keeping the opening itself clean and unobstructed.
Built-In Shelving Options
Why settle for empty wall space when you can frame storage solutions directly into your pass-through’s sides?
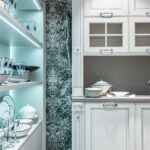
Built-in shelving anchored into the pass-through’s sides creates visible storage without bulky cabinetry taking up valuable space. I recommend shelves around 8 inches deep on the adjoining room side. This depth balances display space with pass-through function, allowing items to be reachable from both rooms without interruption.
Framed, non-wood pass-through openings work particularly well for floating or integrated shelves that maintain a clean, uninterrupted transition between spaces. You can position custom shelves where a window previously existed, preserving your home’s aesthetics while adding functional storage.
These shelves support light decor, cookbooks, and daily-use items. They reduce countertop clutter in your kitchen while keeping essentials within reach.
Maximizing Vertical Wall Space
While built-in shelves offer excellent display storage, you can add even more capacity by extending your storage solutions vertically along the pass-through’s side walls.
1. Install Tall, Narrow Storage
Slim pull-out organizers and narrow pantry drawers maximize vertical space without visually overwhelming your opening. These units fit snugly beside the pass-through, keeping sightlines clear to adjoining rooms while storing everyday essentials efficiently.
2. Use Vertical Dividers and Adjustable Shelves
Stack storage from countertop to ceiling using vertical dividers to organize plates, mugs, and cookbooks. This approach preserves your countertop’s functionality while establishing a complete storage system that serves your household’s needs.
3. Choose Strategic Cabinet Styling
Recessed or high-contrast cabinet doors maintain clean edges around your pass-through opening. This design choice delivers substantial storage capacity while preserving the architectural integrity of your space.
Coordinate Kitchen and Dining Room Finishes

How can you make your kitchen and dining room feel like one unified space? The answer lies in thoughtful material selection and strategic design choices that bridge both areas seamlessly.
I’d recommend preserving existing materials where possible rather than removing full walls. This approach maintains visual continuity between spaces. Consider placing a pass-through above the sink, then adding built-in shelves on the dining side. These shelves mirror window framing and create natural display opportunities.
Use non-wood framed openings with shelf depths around 8 inches for clean lines. Integrate a counter or bar on the dining room side; this supports seating while keeping kitchen finishes intact.
Align your colors, cabinetry styles, and finishes throughout both areas. This consistent strategy connects separate rooms into one inviting space that feels purposefully designed.
Transform Your Kitchen Into an Open Gathering Space

A well-designed pass-through opens your kitchen to the rest of your home, inviting family and guests to gather while you cook. This functional opening changes how you interact with loved ones during meal preparation.
Consider positioning your pass-through above the sink for seamless workflow and natural light. Use non-wood framed openings to create clean visual transitions between spaces. Built-in shelves roughly 8 inches deep on the adjoining room’s side provide practical display and storage without cluttering your kitchen.
Integrate display elements with your pass-through to maintain aesthetic appeal while maximizing functionality. This approach preserves your kitchen’s existing layout and finishes while creating an inviting gathering point. The result is a connected space that encourages conversation and togetherness.
Decide When a Full Kitchen Island Remodel Makes Sense
While pass-throughs open your kitchen visually, they don’t always solve storage or workflow challenges. A full island remodel becomes worthwhile when you’re ready to relocate cabinets into the room’s center, create integrated seating, and establish a dedicated prep zone.
I’d recommend considering this investment if you need better storage, improved traffic flow, and a modern layout that preserves your existing finishes.
When Pass-Throughs Fall Short
Sometimes a pass-through alone won’t solve your kitchen’s layout challenges. You might discover that opening a wall creates insufficient counter space for meal prep and entertaining simultaneously. A full island remodel addresses what pass-throughs typically cannot deliver.
Consider an island remodel when you need:
- Integrated storage solutions like drawers, tall cabinets, and waste pull-outs
- Additional counter workspace for cooking and socializing
- Better traffic flow between functional zones
- Updated appliances and modern finishes
- Clear zoning between cooking and entertaining areas
If removing walls disrupts existing storage or cabinetry style, a center island restores workflow while preserving your design aesthetic. An island also works better when you’re expanding seating or adding room additions, which helps proportions align with new dimensions rather than creating cramped spaces.
Island Remodel Advantages Explained
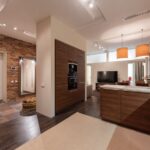
Moving beyond a pass-through to a full island remodel fundamentally reshapes how your kitchen functions. You’ll discover that a centered island creates workflow improvements by consolidating prep and cooking zones. This strategic placement enhances traffic patterns and maximizes counter space for active cooking.
Your new island becomes a multi-functional hub. Lower cabinets provide essential storage while taller upper cabinetry keeps items accessible. Built-in seating allows the island to serve as a casual dining or bar area, connecting your kitchen to adjacent living spaces.
Consider the practical requirements: you’ll need to rework electrical outlets, plumbing lines, and ventilation systems to accommodate the new layout. The investment pays dividends through stronger focal points and distinct kitchen zones that remain open and inviting.