Chocolate chip bars have a special place in the hearts of dessert lovers everywhere.
The rich, buttery flavor combined with the gooey chocolate chips creates a treat that’s irresistibly delightful.
I first encountered these bars at a family gathering, where they quickly disappeared from the dessert table, leaving everyone craving more.
This Toll House Style Classic recipe is not only simple to prepare but also delivers a nostalgic taste that can remind you of home.
The History and Cultural Significance
• Chocolate Chip Bars Recipes Toll House Style Classic traces its origins to the United States in the 1930s, where it was originally created by Ruth Wakefield at the Toll House Inn.
• The dish evolved over decades as chocolate chip cookies gained popularity, leading to variations like bar formats that offered an easier way to share and serve.
• In American culture, these bars traditionally appear at family gatherings, potlucks, and bake sales, symbolizing comfort and togetherness.
• While many variations exist across different regions, the authentic version maintains its signature chewy texture and rich chocolate flavor that sets it apart from imitations.
Recipe Overview
Nutritional Information (per serving)
Ingredients
Essential Equipment Guide
Mixing Bowl: A sturdy mixing bowl is essential for combining ingredients thoroughly. Look for a bowl that’s large enough to hold all ingredients while allowing room for mixing. Glass or stainless steel bowls are great for durability and ease of cleaning.
Baking Pan: A 9×13 inch pan is ideal for making chocolate chip bars. Choose a pan with a non-stick surface or line it with parchment paper for easy removal. Metal pans heat evenly, while glass pans allow you to see the browning.
Spatula: A silicone or rubber spatula is important for folding in chocolate chips and scraping the bowl clean. It helps ensure that all ingredients are evenly mixed, contributing to a consistent texture.
Preparation Methods
Mixing Dry Ingredients: Mixing dry ingredients like flour, baking soda, and salt is essential for even distribution. This process ensures that the leavening agent is evenly incorporated, which helps the bars rise properly. Be sure to whisk the dry ingredients thoroughly before combining them with wet ingredients.
Creaming Butter and Sugars: This technique involves beating the softened butter and sugars together until light and fluffy. This process introduces air into the mixture, which contributes to the bars’ texture. Aim for a pale, creamy consistency before adding eggs and vanilla.
Folding in Chocolate Chips: Gently folding chocolate chips into the batter prevents them from breaking apart while ensuring they are evenly distributed. Use a spatula to lift and fold the batter over the chips, being careful not to overmix, which maintains a tender texture.
Step 1: Prepare Ingredients

Gather all ingredients and measure them accurately.
Ensure that butter is softened to room temperature for easy mixing.
Preheat your oven to 350°F (175°C) to ensure it’s ready for baking.
Line your baking pan with parchment paper for easy removal of the bars.
Step 2: Mix Dry Ingredients

In a medium mixing bowl, combine the flour, baking soda, and salt.
Use a whisk to blend the dry ingredients evenly.
Set this mixture aside while you prepare the wet ingredients.
This step is crucial for ensuring an even rise in your bars.
Step 3: Cream Butter and Sugars

In a large mixing bowl, beat the softened butter, brown sugar, and granulated sugar together.
Use an electric mixer on medium speed until the mixture is light and fluffy.
This process should take about 2-3 minutes.
Proper creaming ensures a light texture in the finished bars.
Step 4: Add Eggs and Vanilla

Add the eggs, one at a time, beating well after each addition.
Incorporate the vanilla extract and mix until fully combined.
This helps to bind the ingredients and adds flavor.
Make sure there are no streaks of egg visible before moving to the next step.
Step 5: Combine Wet and Dry Ingredients

Gradually add the dry ingredient mixture to the wet ingredients.
Mix on low speed just until combined; do not overmix.
This helps maintain a tender texture in the final product.
The batter should be thick and slightly sticky.
Step 6: Fold in Chocolate Chips

Using a spatula, gently fold the chocolate chips into the batter.
Make sure they are evenly distributed throughout the mixture.
Be careful not to overmix, as this will affect the texture.
The batter should be thick with visible chocolate chips.
Step 7: Transfer to Baking Pan

Pour the batter into the prepared baking pan and spread it evenly.
Use a spatula to smooth the top for an even bake.
This helps promote uniform cooking and browning.
Ensure there are no air pockets by pressing down gently.
Step 8: Bake the Bars

Place the baking pan in the preheated oven and bake for 25-30 minutes.
Look for a golden brown top and a slight firmness in the center.
Avoid opening the oven door too often, as this can affect baking time.
The edges should be set, while the center remains slightly soft.
Step 9: Cool and Cut

Remove the pan from the oven and allow the bars to cool in the pan for about 10 minutes.
Then, lift the bars out using the parchment paper and transfer them to a wire rack to cool completely.
Once cool, cut them into squares or rectangles.
Make sure to use a sharp knife for clean edges.
Step 10: Serve and Enjoy

Serve the chocolate chip bars warm or at room temperature.
They can be enjoyed plain or with a scoop of ice cream on the side.
This treat is perfect for sharing with family and friends.
Store any leftovers in an airtight container to maintain freshness.
Critical Timing and Temperature Guide
Mixing Ingredients: Aim for a light and fluffy butter-sugar mixture, which takes about 2-3 minutes of mixing. Avoid overmixing once you add the dry ingredients, as this can lead to a dense texture.
Baking Time: Bake the bars until golden brown, about 25-30 minutes. The center should be set but slightly soft, indicating they will firm up as they cool.
Cooling Time: Allow the bars to cool for at least 10 minutes in the pan before transferring to a wire rack. This helps them set properly and makes cutting easier.
Pro Tips for Chocolate Chip Bars Recipes Toll House Style Classic
• Ingredient Selection: Use high-quality chocolate chips for the best flavor; semi-sweet chips are traditional but feel free to mix in dark chocolate for a richer taste.
• Preparation Secret: Refrigerate the dough for at least 30 minutes before baking to enhance flavor and texture.
• Temperature Management: Ensure butter is at room temperature for easy creaming; cold butter can lead to uneven mixing.
• Texture Enhancement: Slightly underbake the bars for a chewy center; they will continue to cook as they cool.
• Flavor Layering: Experiment with adding nuts or different types of chocolate chips to create depth of flavor.
• Make-Ahead Strategies: You can prepare the batter a day in advance and store it in the fridge until you’re ready to bake.
• Restaurant-Quality Finishing Touches: Sprinkle flaky sea salt on top right before baking for an enhanced flavor contrast.
• Equipment Optimization: Utilize a silicone spatula for mixing and folding; they are flexible and help prevent overmixing.
Troubleshooting Common Issues
• Bars Too Dry: This can happen if you overbake the bars. Look for a golden color and slightly soft center as indicators of doneness. To prevent this, start checking for doneness a few minutes before the recommended baking time.
• Bars Too Gooey: If the center remains raw, it’s likely underbaked. Ensure the edges are set, and return them to the oven for an additional 5 minutes if necessary. Use a toothpick inserted in the center to check for doneness.
• Uneven Texture: This might result from overmixing the batter. Mix just until combined after adding flour. For a more even bake, consider rotating your pan halfway through the baking time.
• Chocolate Chips Sinking: If the chocolate chips sink to the bottom, try tossing them in a bit of flour before adding to the batter; this helps them stay suspended.
• Bars Sticking to the Pan: Ensure you line the pan with parchment paper or grease it well. If they still stick, allow them to cool completely before attempting to remove from the pan.
Variations and Regional Differences
• Nutty Variation: Add 1 cup of chopped nuts like walnuts or pecans for added crunch and flavor.
• Oatmeal Chocolate Chip Bars: Substitute 1 cup of flour with rolled oats for a chewy texture while adding a wholesome touch.
• Peanut Butter Chocolate Chip Bars: Incorporate 1/2 cup of creamy peanut butter into the batter for a rich, nutty flavor.
• Modern Interpretations: Try using gluten-free flour blends or vegan butter for a contemporary twist that accommodates dietary restrictions.
Food Science Behind the Recipe
• Creaming Butter and Sugar: This process incorporates air into the mixture, which helps create a light and fluffy texture in the final bars. The sugar granules cut through the butter, creating tiny air pockets that expand during baking.
• Maillard Reaction: This chemical reaction occurs between amino acids and reducing sugars when baked, resulting in the golden-brown color and complex flavors that enhance the taste of the bars.
• Gluten Development: Proper mixing of flour develops gluten, which provides structure. However, overmixing can lead to tough bars, so it’s essential to mix just until combined.
Frequently Asked Questions
What’s the most common mistake people make when preparing chocolate chip bars? Overmixing the batter can lead to dense, tough bars. To prevent this, mix just until combined after adding flour.
Can I prepare components of this dish in advance? Yes, you can prepare the batter ahead and store it in the refrigerator for up to 24 hours before baking.
How do I adapt this recipe for dietary restrictions? For gluten-free bars, substitute all-purpose flour with a gluten-free blend. Use dairy-free chocolate chips and vegan butter for a dairy-free version.
What’s the best way to store and reheat leftovers? Store leftovers in an airtight container at room temperature for up to 5 days. To reheat, place in a microwave for 10-15 seconds.
Can I freeze this dish? Yes, wrap the bars tightly in plastic wrap and place them in a freezer-safe container for up to 3 months. Thaw at room temperature before serving.
What wine or beverages pair best with this dish? A glass of sweet dessert wine or a cold glass of milk complements the sweetness of the chocolate chip bars nicely.
How can I scale this recipe up for a crowd? Simply multiply the ingredients by the number of servings you need. Consider using multiple baking pans for even cooking.
What side dishes complement this recipe best? A scoop of vanilla ice cream or a dollop of whipped cream enhances the experience.
How do professional chefs elevate this dish for restaurant service? Chefs often serve these bars with gourmet ice cream and a drizzle of chocolate sauce on top, adding an elegant touch.
Serving and Presentation Guide
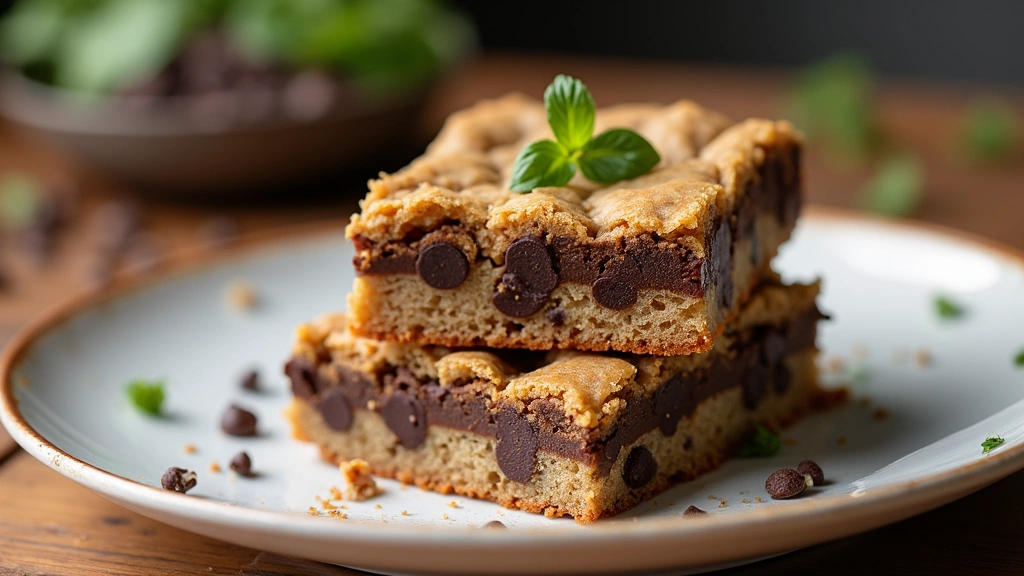
• Traditional Presentation: Serve the bars on a simple white plate, allowing their golden brown color to shine. Consider adding a dusting of powdered sugar on top for an elegant touch.
• Modern Plating Ideas: Plate individual bars with a scoop of ice cream and a drizzle of chocolate sauce, garnished with a sprig of mint for a contemporary look.
• Accompaniment Suggestions: Pair with a cup of coffee or a glass of cold milk to enhance the flavors.
• Special Occasion Presentation: For celebrations, stack the bars on a tiered dessert stand, interspersed with fresh berries for color and freshness.
Conclusion
I hope you enjoy making these delicious chocolate chip bars as much as I do.
Their sweet, buttery flavor is perfect for any occasion, whether it’s a casual family gathering or a special celebration.
Give this recipe a try, and you’ll find it becomes a cherished favorite in your home.